
Understanding Dubsado’s Delay Triggers
What seems simple on paper can turn into chaos in practice — like Dubsado’s delay triggers.

In Dubsado, delay triggers are used in workflows to automatically send emails or perform actions a set number of days after something happens (like a form not being completed, a contract being signed, or an invoice being paid). They’re commonly used to follow up with clients who haven’t taken an action, or to space out communication throughout a client journey. They're supposed to save you time, keep you accountable, consistent, and your client journey on track.
Seems straightforward, right?
But, if you’re not careful, those delays can stack, overlap, or fire off way out of sync — leaving you with emails arriving on the wrong days, double follow-ups, or even skipped steps.
Let’s break down how delay triggers actually work behind the scenes — and how to use them intentionally to avoid surprises in your automations.
Delay Triggers in DUBSADO Workflows
In Dubsado, most workflow actions allow you to add a delay and choose a triggering event.
Delay Timing options:
This is the number of hours, days, week, or years to wait after the triggering event before the action happens.
✨FUN FACT✨ While Dubsado doesn’t publish a maximum for hour-based delays, I tested it — and it accepted a delay of 87,600 hours (aka 10 years). Will it trigger? 🤷🏻♀️ Who knows. But hey, it’s technically valid! Use with caution.
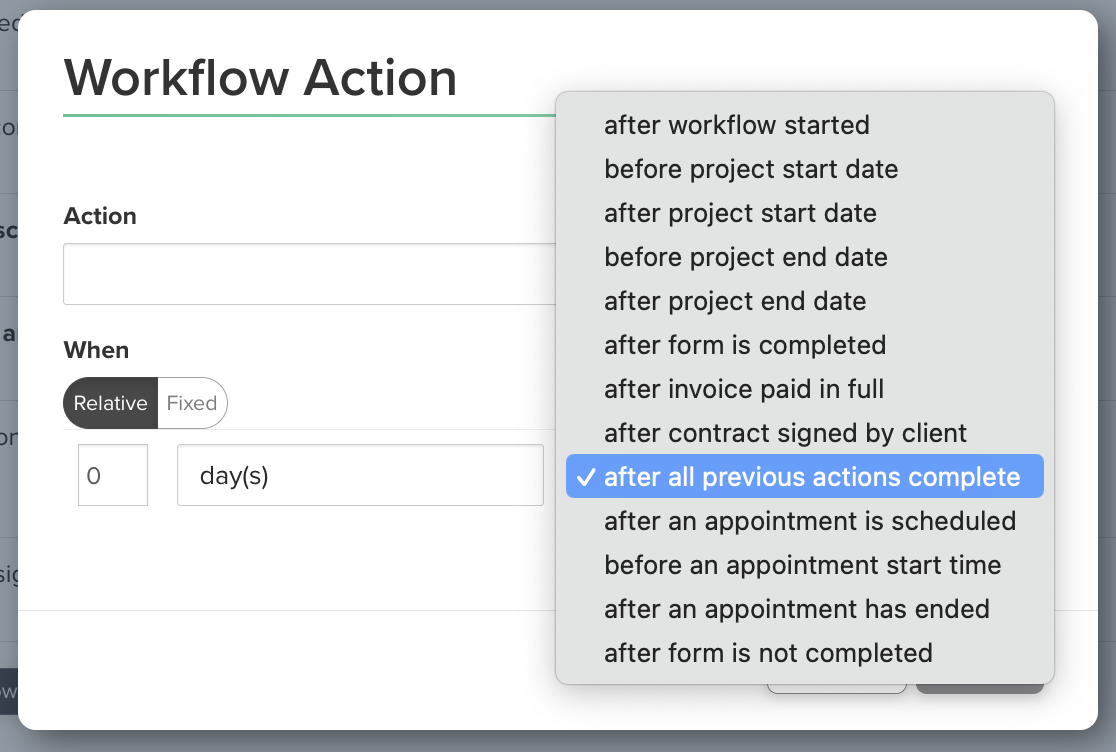
Triggering Event Options:
After All Previous Actions Complete
After Form is Not Completed
After Contract is Signed
After Invoice is Paid
After Project Start Date
…and more.
These two settings — delay + trigger event — are the foundation of timing your workflows.
Why “After All Previous Actions Complete” Isn’t Always the Best Choice
A common mistake is using “After All Previous Actions Complete” for everything. While that can work in some situations, it makes your workflow overly dependent on the order of the steps and can lead to unpredictable timing — especially when certain actions rely on client interaction.
Using specific trigger events (like “After Form is Not Completed”) gives you more control, precision, and predictability. You can time your follow-ups based on the original client action — not just the last thing your automation did.
This makes for a smoother, more human experience for your client — and fewer surprises for you.
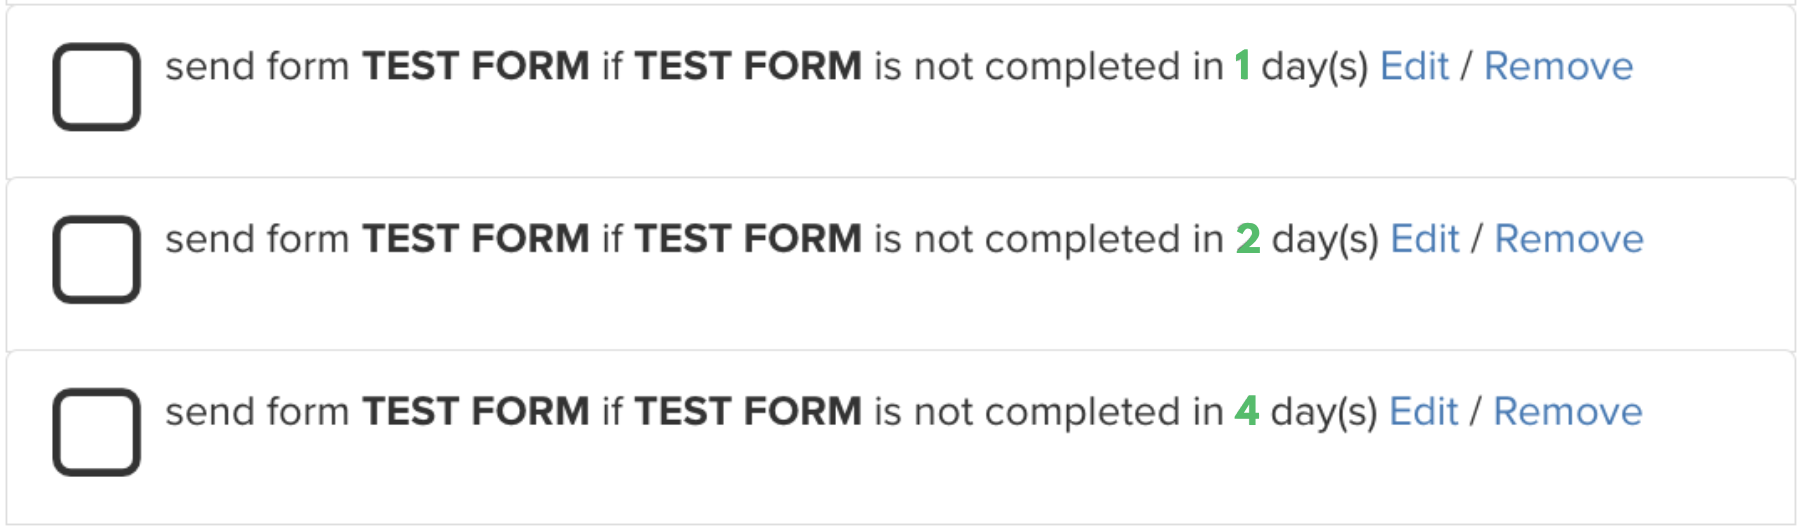
Delay Triggers Count From the Most Recent Sent Form
Let’s say you want to send follow-ups if a form isn’t completed 1 day after, 3 days after and 7 days after the form was originally sent.
You might build it like this:

It makes sense to expect these reminders to count from the original form send — but here’s how Dubsado actually handles this:
Since the form was first sent
1 day has elapsed when the first reminder is sent
4 days has elapsed when the second reminder is sent
11 days has elapsed when the third reminder is sent
Wait, what?! A reminder 11 days after the original form? That wasn’t the plan.
Why This Happens
Every time a follow-up email is sent — and includes the form again — Dubsado treats it as a new form delivery. The delay trigger starts fresh from that new send.
So instead of all delays counting from the original form send, each follow-up resets the clock.
How to Fix It
If you want follow-ups to hit at specific milestones (like 1, 3, and 7 days after the original form), you’ll need to adjust your delay times by adding the delays together. In this case 1+2+4=7 days:
Here’s how that sequence would play out in Dubsado:
Since the form was first sent
1 day has elapsed when the first reminder is sent
3 days has elapsed when the second reminder is sent
7 days has elapsed when the third reminder is sent
A cleaner, more predictable sequence — ending exactly 7 days after the original send, just like you planned.
Workflow Order ≠ Send Order
The position of steps in your workflow doesn’t control timing — the delays do.
Here’s an example:

Even though the 4-day step is listed before the 2-day one, Dubsado doesn’t care — it will send the 1-day reminder first, then the 2-day one, then the 4-day one, based on timing.
This is why delay math matters more than workflow order. Think in timelines, not just sequences.
✨PRO TIP✨ This timing logic applies to other triggers too — not just delays.
Let’s say you build a workflow like this:

At first glance, it might look like everything is paused at the “Hold until Contract is signed” step — but it’s not.
In this case, only the invoice is being held. The final step (“Send Email”) is triggered by the form completion, so it will send even if the workflow is technically on hold.
This kind of nuance matters when designing workflows — especially when mixing different types of triggers. Always double-check which step each action is actually tied to so nothing sends earlier (or later) than expected.
Avoid Duplicate Delays — Use Decimals If Needed
If you have two actions set to trigger at the exact same delay, they’ll both fire at the same time — which can feel chaotic or confusing to your client.
Let’s say:

They’ll both go out together unless you stagger them.
A simple fix? Use decimal delays:

Now they’re spaced out — and Dubsado will treat them as separate. Which means the first reminder will go out 4 days after the original and the second will go out 4 days and 2.5 hours after the first reminder.
You can use this trick to space out multi-step reminders or tasks without adding full extra days by adding 0.25 hour delay (15min).
Why All This Matters for Your Business

Delay triggers control the tempo of your client journey. When they’re used well, they create a smooth, professional experience that respects your client’s time and keeps projects moving forward.
But if they’re messy or inconsistent, they can:
Lead to confusing communication
Make you look unorganized
Break trust with clients
Cause you to miss important follow-ups
Intentional timing = a better experience for your clients and your sanity.
✨BONUS INFORMATION✨
In Dubsado 3.0, you can set workflow automation working hours.
If you specify hours (e.g., 8 AM–6 PM), then your delays will only trigger within that window.
For example, if your client fills out their form at 10pm, the “1 day after form is completed” step won’t go out at 1opm the next day — it’ll wait and send at 8:00 AM when your working hours begin.
This setting can help keep emails from landing at weird hours — but it’s not available in Dubsado 2.0.
Need Help Perfecting Your Workflow Timing?
If your automations aren’t working quite right or you want to maximize your Dubsado setup, I’m here to help.
Feel free to REACH OUT! Together, we’ll make sure your delay triggers are set up for success — so you can focus on growing your business.